本文最后更新于:2024年4月16日 下午
概念 延时队列也是一个消息队列,和普通队列区别之处只是它带有延时功能 。例如实际开发的某些场景中,需要让消息在指定时间才会被消费
订单下单后指定时间未付款就取消
用户注册后,指定时间内未登录或验证,发送消息提醒
某个业务操作失败后,间隔一段时间重试或进行其他操作
类似的场景其实很多。并且上述情况好像也可以通过定时任务轮询来处理,但是性能不高,并且业务数据量大&存在高并发的场景下,极易导致系统宕掉,另一方面定时任务的轮询也会有较大误差产生。
RabbitMQ本身是不支持延时队列的,但是可以通过定制方式实现
改造死信队列的TTL模式 ,使消息过期后全部进入死信队列,来达到延时的效果使用延时队列插件 ,让交换器管理延时消息
操作 这里操作按照整合SpringBoot进行,参照整合SpringBoot,先创建SpringBoot模块,并勾选相关依赖,在yml配置文件中添加rabbitmq连接
1
2
3
4
5
6
7
8
9
10
spring: rabbitmq: host: 192.168 .204 .127 port: 5672 username: guest password: guest virtual-host: / mvc: pathmatch: matching-strategy: ant_path_matcher
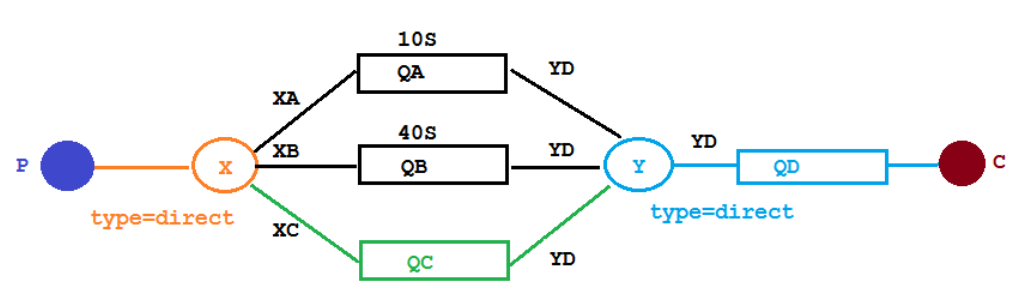
队列TTL延时 创建RabbitMQ配置类,其中队列QA、QB的过期时间分别是10s、40s,再创建交换器X和死信交换器Y,二者都是direct类型,最后创建死信队列QD存放死信消息
消费者不监听QA、QB队列,使消息进入队列后不被消费导致TTL超时进入延迟队列QD
【注】设计的缺点:每增加一个新的延时时间需求,就需要增加一个队列
1
2
3
4
5
6
7
8
9
10
11
12
13
14
15
16
17
18
19
20
21
22
23
24
25
26
27
28
29
30
31
32
33
34
35
36
37
38
39
40
41
42
43
44
45
46
47
48
49
50
51
52
53
54
55
56
57
58
59
60
61
62
63
64
65
66
67
68
69
70
71
72
73
74
75
76
77
78
79
@Configuration public class TTLQueueConfig {public static final String X_EXCHANGE = "ex_x" ;public static final String QUEUE_A = "QA" ;public static final String QUEUE_B = "QB" ;public static final String QUEUE_C = "QC" ;public static final String Y_EXCHANGE = "ex_y" ;public static final String QUEUE_D = "QD" ;@Bean("xExchange") public DirectExchange xExchange () {return new DirectExchange (X_EXCHANGE);@Bean("yExchange") public DirectExchange yExchange () {return new DirectExchange (Y_EXCHANGE);@Bean("queueA") public Queue queueA () {new HashMap <>(3 );"x-dead-letter-exchange" , Y_EXCHANGE);"x-dead-letter-routing-key" , "RK_Y" );"x-message-ttl" , 10000 );return QueueBuilder.durable(QUEUE_A).withArguments(map).build();@Bean public Binding queueBindingA (@Qualifier("queueA") Queue queueA, @Qualifier("xExchange") DirectExchange xExchange) {return BindingBuilder.bind(queueA).to(xExchange).with("RK_XA" );@Bean("queueB") public Queue queueB () {new HashMap <>(3 );"x-dead-letter-exchange" , Y_EXCHANGE);"x-dead-letter-routing-key" , "RK_Y" );"x-message-ttl" , 40000 );return QueueBuilder.durable(QUEUE_B).withArguments(map).build();@Bean public Binding queueBindingB (@Qualifier("queueB") Queue queueB, @Qualifier("xExchange") DirectExchange xExchange) {return BindingBuilder.bind(queueB).to(xExchange).with("RK_XB" );@Bean("queueC") public Queue queueC () {new HashMap <>(3 );"x-dead-letter-exchange" , Y_EXCHANGE);"x-dead-letter-routing-key" , "RK_Y" );return QueueBuilder.durable(QUEUE_C).withArguments(map).build();@Bean public Binding queueBindingC (@Qualifier("queueC") Queue queueC, @Qualifier("xExchange") DirectExchange xExchange) {return BindingBuilder.bind(queueC).to(xExchange).with("RK_XC" );@Bean("queueD") public Queue queueD () {return new Queue (QUEUE_D);@Bean public Binding queueBindingD (@Qualifier("queueD") Queue queueD, @Qualifier("yExchange") DirectExchange yExchange) {return BindingBuilder.bind(queueD).to(yExchange).with("RK_Y" );
1、生产者
1
2
3
4
5
6
7
8
9
10
11
12
13
14
15
@Slf4j @RequestMapping("ttl") @RestController public class SendMsgController {@Resource private RabbitTemplate rabbitTemplate;@GetMapping("sendMsg/{msg}") public void sendMsg (@PathVariable String msg) {"当前时间----->{},发送消息给两个TTL队列----->{}" , new Date (), msg);"ex_x" , "RK_XA" , "消息存放于ttl=10s队列QA中----->" + msg);"ex_x" , "RK_XB" , "消息存放于ttl=10s队列QA中----->" + msg);
2、消费者
1
2
3
4
5
6
7
8
9
10
@Slf4j @Component public class DLQueueConsumer {@RabbitListener(queues = "QD") public void receiveD (Message message, Channel channel) {String msg = new String (message.getBody());"当前时间----->{},从死信队列获取到的消息----->{}" , new Date (), msg);
启动项目访问:http://localhost:8080/ttl/sendMsg/发送消息TTL,看到控制台对应输出
消息TTL延时 上面的方法缺点很明显,不同的延时时间就需要不同的队列,可见通过队列TTL设置会比较麻烦
改造一下,在配置列中添加队列QC,不设置TTL
缺点:如果积压在队列前面的消息延时时长很长,而后面积压的消息延时时长很短,积压时间短的消息并不会被提前放入死信队列;如果QC恰好又设置了积压上限,无法被积压的消息将直接进入延时队列,达不到延时效果
生产者添加代码:
1
2
3
4
5
6
7
8
@GetMapping("sendExpirationMsg/{msg}/{ttlTime}") public void sendMsgWithTTL (@PathVariable String msg, @PathVariable String ttlTime) {"ex_x" , "RK_XC" , msg, correlationData -> {return correlationData;"当前时间----->{},发送一个TTL为{}的消息给队列C----->{}" , new Date (), ttlTime, msg);
设置消息的TTL,值通过参数传入,实现不同消息具有不同TTL,可以对应到业务中的不同任务。只用了一个队列,但是实现了不同时间的延时
插件延时 插件安装 在RabbitMQ官网-社区插件 中下载rabbitmq_delayed_message_exchange插件,通过FileZilla等FTP工具传到虚拟机中
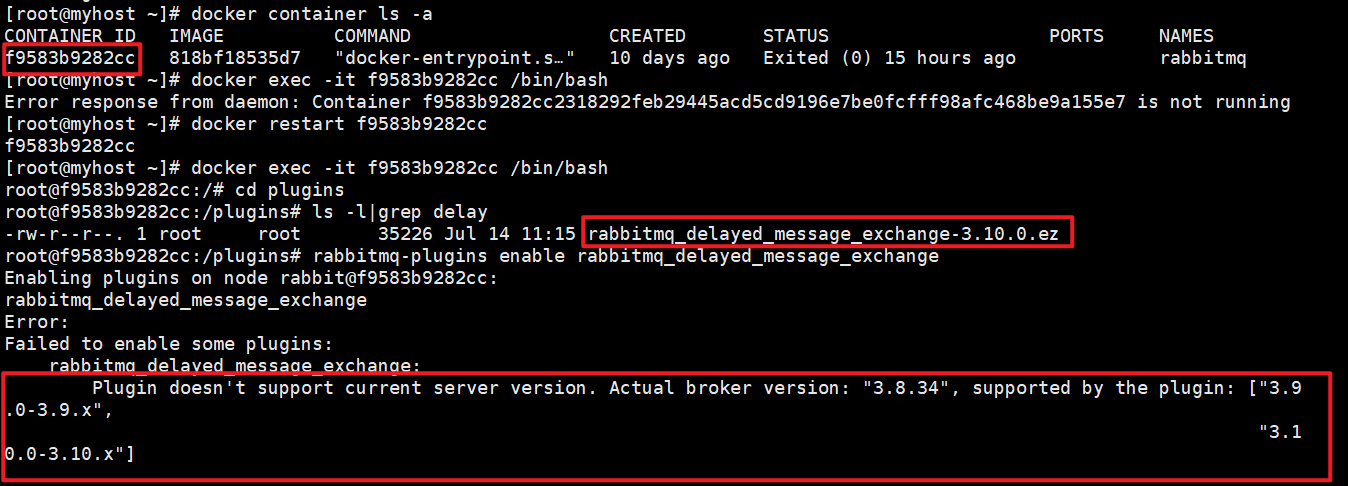
1
2
3
4
5
6
7
8
9
# 将插件复制到容器对应的plugins目录下 # 进入容器内部 需要容器处于运行状态 # 查看插件是否成功复制到指定目录 # 开启运行插件
注意rabbitmq的版本和插件的版本,我的RabbitMQ版本为3.8.34,插件在GitHub上下载3.10.x后运行提示报错,我看报错信息部分写了supported by the plugin: ["3.9.0-3.9.x", "3.10.0-3.10.x"]所以我把3.9到3.10的版本都试了下但是都不行!
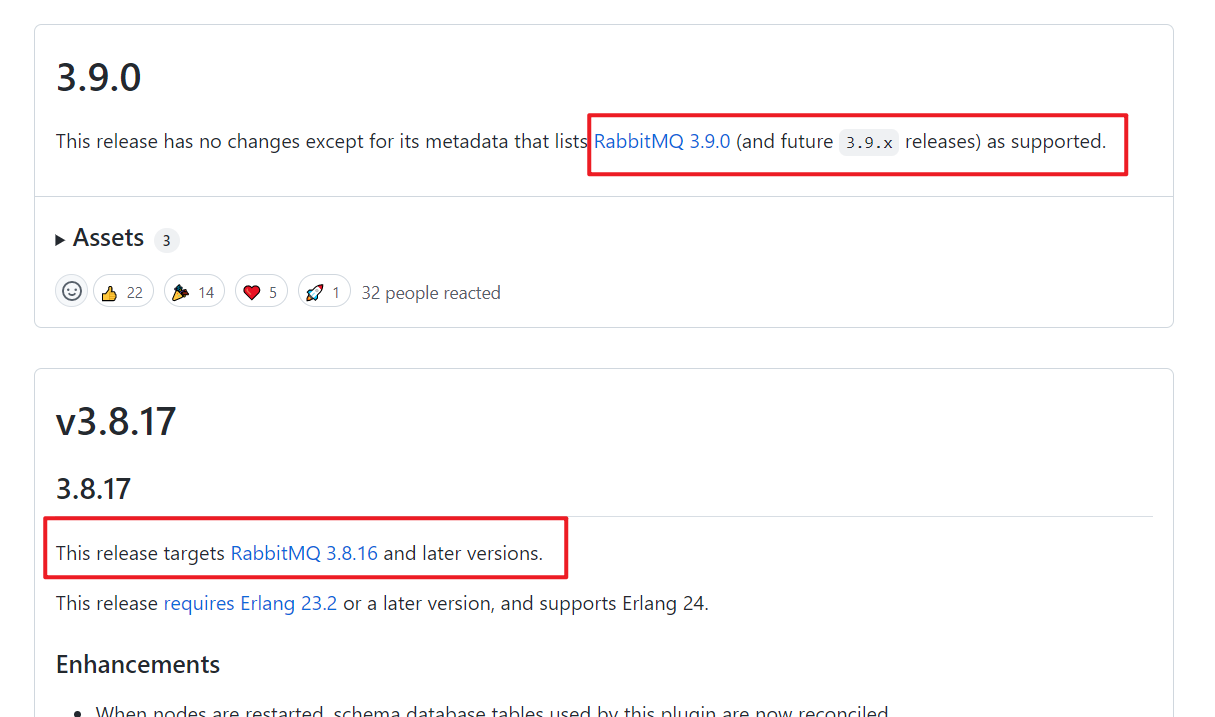
关于版本支持的说明,应该去GitHub上看插件说明,可以看到3.9.x的插件对应的是3.9.x的RabbitMQ,我的版本就应该选择3.8.x来适配
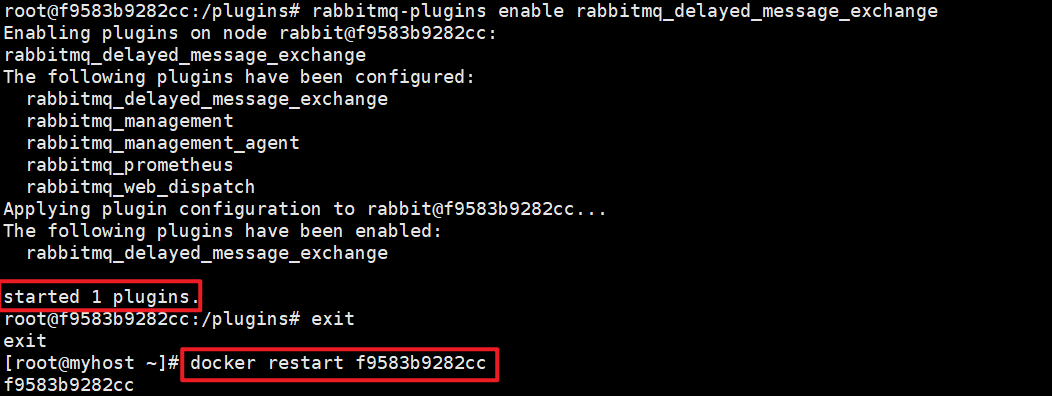
更换插件版本后即可成功,然后重启rabbitmq,在管理后台界面查看插件是否成功启用
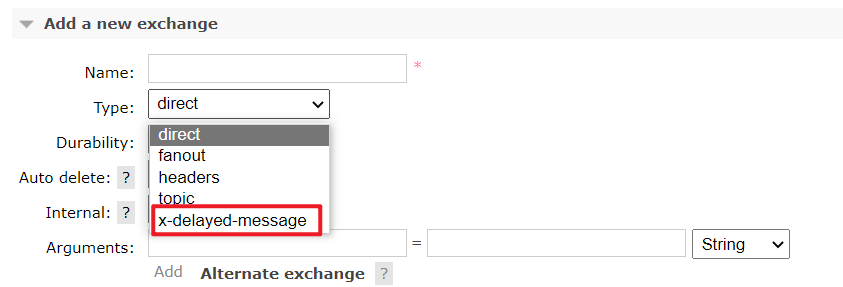
插件延时操作 这里创建了一个direct交换机和队列,结构如图
在我们自定义的交换机中,这是一种新的交换类型,该类型消息支持延迟投递机制消息传递后并不会立即投递到目标队列中,而是存储在 mnesia(一个分布式数据系统)表中,当达到投递时间时,才投递到目标队列中
1、配置类
1
2
3
4
5
6
7
8
9
10
11
12
13
14
15
16
17
18
19
20
21
22
23
24
25
26
27
28
29
30
31
@Configuration public class DelayedQueueConfig {public static final String DELAYED_QUEUE = "delayed.queue" ;public static final String DELAYED_EXCHANGE = "delayed.exchange" ;public static final String DELAYED_ROUTING_KEY = "delayed.routingKey" ;@Bean public CustomExchange delayedExchange () {new HashMap <>(1 );"x-delayed-type" , "direct" ); return new CustomExchange (DELAYED_EXCHANGE, "x-delayed-message" , true , false , map);@Bean public Queue delayedQueue () {return QueueBuilder.durable(DELAYED_QUEUE).build();@Bean public Binding delayedBinding (@Qualifier("delayedQueue") Queue delayedQueue, @Qualifier("delayedExchange") CustomExchange delayedExchange) {return BindingBuilder.bind(delayedQueue).to(delayedExchange)
2、生产者,在对应controller中添加方法
1 2 3 4 5 6 7 8 9 @RequestMapping("/plugins/sendMsg/{msg}/{time}") public void sendMsgByPlugin (@PathVariable String msg, @PathVariable Integer time) {MessageProperties properties = new MessageProperties ();Message message = new Message (msg.getBytes(StandardCharsets.UTF_8), properties);"当前时间:{},发送过期时间为{}毫秒的消息到延时插件,内容为:{}" , new Date (), time, msg);"delayed.exchange" , "delayed.routingKey" , message);
3、消费者,在对应controller添加监听
1 2 3 4 5 6 @RabbitListener(queues = "delayed.queue") public void receiveDelayQueue (Message msg, Channel channel) {String message = new String (msg.getBody());"当前时间:{},收到延时消息:{}" , new Date (), message);
运行后查看效果
总结 延时队列在需要延时处理的场景下非常有用,使用 RabbitMQ 来实现延时队列可以很好的利用RabbitMQ 的特性,如:消息可靠发送、消息可靠投递、死信队列来保障消息至少被消费一次以及未被正确处理的消息不会被丢弃。另外,通过 RabbitMQ 集群的特性,可以很好的解决单点故障问题,不会因为 单个节点挂掉导致延时队列不可用或者消息丢失。
当然,延时队列还有很多其它选择,比如利用 Java 的 DelayQueue,利用 Redis 的 zset,利用 Quartz 或者利用 kafka 的时间轮,这些方式各有特点,看需要适用的场景