本文最后更新于:2024年5月10日 下午
介绍 Mybatis属实良心,对于在spring中整合mybatis,同样有官方文档可以参考。
【参】Mybatis-Spring文档
MyBatis-Spring 会帮助你将 MyBatis 代码无缝地整合到 Spring 中。它将允许 MyBatis 参与到 Spring 的事务管理之中,创建映射器 mapper 和 SqlSession 并注入到 bean 中,以及将 Mybatis 的异常转换为 Spring 的 DataAccessException。最终,可以做到应用代码不依赖于 MyBatis,Spring 或 MyBatis-Spring。
当然,整合的前提是要先熟悉Mybatis和Spring了。对应版本也要注意:
准备工作 1、首先要导入相关依赖,参照之前的Spring module来导入,再加上特有的包
mysql-connector-java、mybatis、spring-webmvc、spring-jdbc、aspectjweaver、**mybatis-spring**、lombok 依赖
1 2 3 4 5 6 7 8 9 10 11 12 13 14 15 16 17 18 19 20 21 22 23 24 25 26 27 28 29 30 31 32 33 34 35 36 37 38 39 40 41 42 43 <dependencies > <dependency > <groupId > mysql</groupId > <artifactId > mysql-connector-java</artifactId > <version > 5.1.47</version > </dependency > <dependency > <groupId > org.mybatis</groupId > <artifactId > mybatis</artifactId > <version > 3.5.3</version > </dependency > <dependency > <groupId > org.springframework</groupId > <artifactId > spring-webmvc</artifactId > <version > 5.2.9.RELEASE</version > </dependency > <dependency > <groupId > org.springframework</groupId > <artifactId > spring-jdbc</artifactId > <version > 5.2.9.RELEASE</version > </dependency > <dependency > <groupId > org.aspectj</groupId > <artifactId > aspectjweaver</artifactId > <version > 1.9.5</version > </dependency > <dependency > <groupId > org.mybatis</groupId > <artifactId > mybatis-spring</artifactId > <version > 2.0.5</version > </dependency > <dependency > <groupId > org.projectlombok</groupId > <artifactId > lombok</artifactId > <version > 1.16.10</version > </dependency > </dependencies >
2、编写配置文件
(1)编写pojo实体类
1
2
3
4
5
6
@Data public class User {private int id;private String name;private String pwd;
(2)Mybatis的配置文件
1
2
3
4
5
6
7
8
9
10
11
12
13
14
15
16
17
18
19
20
21
22
23
24
25
26
27
28
29
<?xml version="1.0" encoding="UTF-8" ?> <!DOCTYPE configuration PUBLIC "-//mybatis.org//DTD Config 3.0//EN" "http://mybatis.org/dtd/mybatis-3-config.dtd" > <configuration > <typeAliases > <typeAlias type ="com.liu10.pojo.User" alias ="User" /> </typeAliases > <environments default ="development" > <environment id ="development" > <transactionManager type ="JDBC" /> <dataSource type ="POOLED" > <property name ="driver" value ="com.mysql.jdbc.Driver" /> <property name ="url" value ="jdbc:mysql://localhost:3306/mybatis?useSSL=false& useUnicode=true& characterEncoding=utf8" /> <property name ="username" value ="root" /> <property name ="password" value ="leslie61" /> </dataSource > </environment > </environments > <mappers > <mapper resource ="com/liu10/mapper/UserMapper.xml" /> </mappers > </configuration >
(3)User接口
1
2
3
public interface UserMapper {selectUser () ;
(4)接口对应的mapper映射
1
2
3
4
5
6
7
8
9
10
11
<?xml version="1.0" encoding="UTF-8" ?> <!DOCTYPE mapper PUBLIC "-//mybatis.org//DTD Config 3.0//EN" "http://mybatis.org/dtd/mybatis-3-mapper.dtd" > <mapper namespace ="com.liu10.mapper.UserMapper" > <select id ="selectUser" resultType ="User" > </select > </mapper >
测试类
3、编写测试代码
回顾Mybatis 先回顾Mybatis,参照Mybatis的方式去实现一遍,然后再用Spring去重构代码
(1)编写pojo实体类
1
2
3
4
5
6
@Data public class User {private int id;private String name;private String pwd;
(2)Mybatis的配置文件
1
2
3
4
5
6
7
8
9
10
11
12
13
14
15
16
17
18
19
20
21
22
23
24
25
26
27
28
29
<?xml version="1.0" encoding="UTF-8" ?> <!DOCTYPE configuration PUBLIC "-//mybatis.org//DTD Config 3.0//EN" "http://mybatis.org/dtd/mybatis-3-config.dtd" > <configuration > <typeAliases > <typeAlias type ="com.liu10.pojo.User" alias ="User" /> </typeAliases > <environments default ="development" > <environment id ="development" > <transactionManager type ="JDBC" /> <dataSource type ="POOLED" > <property name ="driver" value ="com.mysql.jdbc.Driver" /> <property name ="url" value ="jdbc:mysql://localhost:3306/mybatis?useSSL=false& useUnicode=true& characterEncoding=utf8" /> <property name ="username" value ="root" /> <property name ="password" value ="leslie61" /> </dataSource > </environment > </environments > <mappers > <mapper resource ="com/liu10/mapper/UserMapper.xml" /> </mappers > </configuration >
(3)User接口
1
2
3
public interface UserMapper {selectUser () ;
(4)接口对应的mapper映射
1
2
3
4
5
6
7
8
9
10
11
<?xml version="1.0" encoding="UTF-8" ?> <!DOCTYPE mapper PUBLIC "-//mybatis.org//DTD Config 3.0//EN" "http://mybatis.org/dtd/mybatis-3-mapper.dtd" > <mapper namespace ="com.liu10.mapper.UserMapper" > <select id ="selectUser" resultType ="User" > </select > </mapper >
(5)测试类
【注】这里同样使用了之前Mybatis的工具类MybatisUtils
1
2
3
4
5
6
7
8
9
10
11
12
13
14
15
16
17
18
19
20
import ***;public class MyTest {@Test public void test () throws IOException {SqlSession sqlSession = MybatisUtils.getSession();UserMapper mapper = sqlSession.getMapper(UserMapper.class);for (User user : userList) {
Spring整合 以官方文档的入门为讲解,应该没有比它更权威更官方的了😂,而且示例代码+文字讲解还是很容易理解的。
安装 要使用 MyBatis-Spring 模块,只需要在类路径下包含 mybatis-spring-2.0.5.jar 文件和相关依赖即可。
如果使用 Maven 作为构建工具,仅需要在 pom.xml 中加入以下代码即可:
1 2 3 4 5 <dependency > <groupId > org.mybatis</groupId > <artifactId > mybatis-spring</artifactId > <version > 2.0.5</version > </dependency >
快速上手 要和 Spring 一起使用 MyBatis,需要在 Spring 应用上下文中定义至少两样东西:一个 SqlSessionFactory 和至少一个数据映射器类。
在 MyBatis-Spring 中,可使用 SqlSessionFactoryBean来创建 SqlSessionFactory。 要配置这个工厂 bean,只需要把下面代码放在 Spring 的 XML 配置文件中:
1 2 3 <bean id ="sqlSessionFactory" class ="org.mybatis.spring.SqlSessionFactoryBean" > <property name ="dataSource" ref ="dataSource" /> </bean >
1
2
3
4
5
6
@Bean public SqlSessionFactory sqlSessionFactory () throws Exception {SqlSessionFactoryBean factoryBean = new SqlSessionFactoryBean ();return factoryBean.getObject();
【注意】:SqlSessionFactory 需要一个 DataSource(数据源)。 这可以是任意的 DataSource,只需要和配置其它 Spring 数据库连接一样配置它就可以了。
假设你定义了一个如下的 mapper 接口:
1
2
3
4
public interface UserMapper {@Select("SELECT * FROM users WHERE id = #{userId}") getUser (@Param("userId") String userId) ;
那么可以通过 MapperFactoryBean 将接口加入到 Spring 中:
1 2 3 4 <bean id ="userMapper" class ="org.mybatis.spring.mapper.MapperFactoryBean" > <property name ="mapperInterface" value ="org.mybatis.spring.sample.mapper.UserMapper" /> <property name ="sqlSessionFactory" ref ="sqlSessionFactory" /> </bean >
需要注意的是:所指定的映射器类必须 是一个接口,而不是具体的实现类。在这个示例中,通过注解来指定 SQL 语句,但是也可以使用 MyBatis 映射器的 XML 配置文件。
配置好之后,你就可以像 Spring 中普通的 bean 注入方法那样,将映射器注入到你的业务或服务对象中。MapperFactoryBean 将会负责 SqlSession 的创建和关闭。如果使用了 Spring 的事务功能,那么当事务完成时,session 将会被提交或回滚。最终任何异常都会被转换成 Spring 的 DataAccessException 异常。
使用 Java 代码来配置的方式如下:
1
2
3
4
5
@Bean public UserMapper userMapper () throws Exception {SqlSessionTemplate sqlSessionTemplate = new SqlSessionTemplate (sqlSessionFactory());return sqlSessionTemplate.getMapper(UserMapper.class);
要调用 MyBatis 的数据方法,只需一行代码:
1
2
3
4
5
6
7
8
9
10
11
12
public class FooServiceImpl implements FooService {private final UserMapper userMapper;public FooServiceImpl (UserMapper userMapper) {this .userMapper = userMapper;public User doSomeBusinessStuff (String userId) {return this .userMapper.getUser(userId);
整合操作 官方文档在关于Spring操作SqlSession部分有以下介绍:
在 MyBatis 中,你可以使用 SqlSessionFactory 来创建 SqlSession。一旦你获得一个 session 之后,你可以使用它来执行映射了的语句,提交或回滚连接,最后,当不再需要它的时候,你可以关闭 session。使用 MyBatis-Spring 之后,你不再需要直接使用 SqlSessionFactory 了,因为你的 bean 可以被注入一个线程安全的 SqlSession,它能基于 Spring 的事务配置来自动提交、回滚、关闭 session。
有两种形式:
使用SqlSessionTemplate
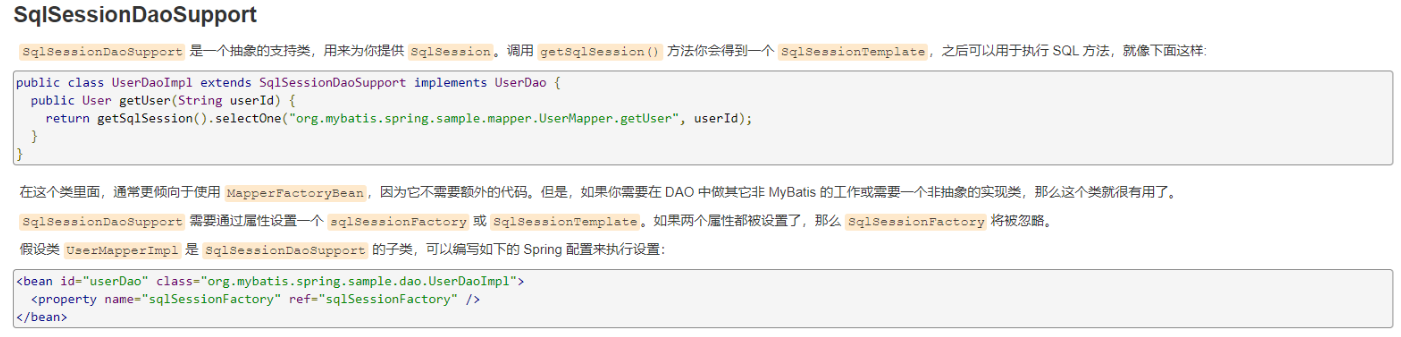
使用SqlSessionDaoSupport
1、引入Spring配置文件beans.xml
1
2
3
4
5
<?xml version="1.0" encoding="UTF-8" ?> <beans xmlns ="http://www.springframework.org/schema/beans" xmlns:xsi ="http://www.w3.org/2001/XMLSchema-instance" xsi:schemaLocation ="http://www.springframework.org/schema/beans http://www.springframework.org/schema/beans/spring-beans.xsd" >
2、将数据源替换成我们的Mybatis
1 2 3 4 5 6 7 8 9 10 <bean id ="dataSource" class ="org.springframework.jdbc.datasource.DriverManagerDataSource" > <property name ="driverClassName" value ="com.mysql.jdbc.Driver" /> <property name ="url" value ="jdbc:mysql://localhost:3306/mybatis?useSSL=false& useUnicode=true& characterEncoding=utf8" /> <property name ="username" value ="root" /> <property name ="password" value ="leslie61" /> </bean >
3、配置SqlSessionFactory并关联Mybatis
1 2 3 4 5 6 7 8 9 10 <bean id ="sqlSessionFactory" class ="org.mybatis.spring.SqlSessionFactoryBean" > <property name ="dataSource" ref ="dataSource" /> <property name ="configLocation" value ="classpath:MybatisConfig.xml" /> <property name ="mapperLocations" value ="classpath:com/liu10/mapper/UserMapper.xml" /> </bean >
4、注册sqlSessionTemplate,关联sqlSessionFactory
1 2 3 4 5 <bean id ="sqlSession" class ="org.mybatis.spring.SqlSessionTemplate" > <constructor-arg index ="0" ref ="sqlSessionFactory" /> </bean >
5、增加Dao接口实现类,并私有化SqlSessionTemplate
1
2
3
4
5
6
7
8
9
10
11
12
13
14
15
public class UserMapperImpl implements UserMapper {private SqlSessionTemplate sqlSession;public void setSqlSession (SqlSessionTemplate sqlSession) {this .sqlSession = sqlSession;public List<User> selectUser () {UserMapper mapper = sqlSession.getMapper(UserMapper.class);return mapper.selectUser();
6、注册bean对象实现
1 2 3 4 <bean class ="com.liu10.mapper.UserMapperImpl" id ="userMapperImpl" > <property name ="sqlSession" ref ="sqlSession" /> </bean >
7、测试代码
1
2
3
4
5
6
7
8
9
10
@Test public void testSpring () {ApplicationContext context = new ClassPathXmlApplicationContext ("applicationContext.xml" );UserMapper mapper = context.getBean("userMapperImpl" , UserMapper.class);for (User user : userList) {
看看官方文档关于SqlSessionDaoSupport的介绍
具体操作与上面其实类似,可以自己尝试一下
相比之前Mybatis操作,现在最大的区别就是对于SqlSession我们不再需要自己去通过SqlSessionFactory创建了,而是交由bean管理,Mybatis的配置文件也完全可以不用了,通过整合在Spring配置中即可
【优化一下】:将上面的Spring配置文件分成两个
SpringDao.xml专注于数据库的操作,可以将数据库的配置专门放在SpringDao.xml中,将其写死即可applicationContext专注于实现类的注册等,数据库的部分放在SpringDao即可
1
2
3
4
5
6
7
8
9
10
11
12
13
14
15
16
17
18
19
20
21
22
23
24
25
26
27
28
29
30
31
32
33
34
35
36
37
38
39
40
41
<?xml version="1.0" encoding="UTF-8" ?> <beans xmlns ="http://www.springframework.org/schema/beans" xmlns:xsi ="http://www.w3.org/2001/XMLSchema-instance" xmlns:context ="http://www.springframework.org/schema/context" xmlns:aop ="http://www.springframework.org/schema/aop" xsi:schemaLocation ="http://www.springframework.org/schema/beans https://www.springframework.org/schema/beans/spring-beans.xsd http://www.springframework.org/schema/context https://www.springframework.org/schema/context/spring-context.xsd http://www.springframework.org/schema/aop https://www.springframework.org/schema/aop/spring-aop.xsd" ><bean id ="dataSource" class ="org.springframework.jdbc.datasource.DriverManagerDataSource" > <property name ="driverClassName" value ="com.mysql.jdbc.Driver" /> <property name ="url" value ="jdbc:mysql://localhost:3306/mybatis?useSSL=false& useUnicode=true& characterEncoding=utf8" /> <property name ="username" value ="root" /> <property name ="password" value ="leslie61" /> </bean > <bean id ="sqlSessionFactory" class ="org.mybatis.spring.SqlSessionFactoryBean" > <property name ="dataSource" ref ="dataSource" /> <property name ="configLocation" value ="classpath:MybatisConfig.xml" /> <property name ="mapperLocations" value ="classpath:com/liu10/mapper/UserMapper.xml" /> </bean > <bean id ="sqlSession" class ="org.mybatis.spring.SqlSessionTemplate" > <constructor-arg index ="0" ref ="sqlSessionFactory" /> </bean > </beans >
1
2
3
4
5
6
7
8
9
10
11
12
13
14
15
16
17
18
19
20
21
22
23
24
<?xml version="1.0" encoding="UTF-8" ?> <beans xmlns ="http://www.springframework.org/schema/beans" xmlns:xsi ="http://www.w3.org/2001/XMLSchema-instance" xmlns:context ="http://www.springframework.org/schema/context" xmlns:aop ="http://www.springframework.org/schema/aop" xsi:schemaLocation ="http://www.springframework.org/schema/beans https://www.springframework.org/schema/beans/spring-beans.xsd http://www.springframework.org/schema/context https://www.springframework.org/schema/context/spring-context.xsd http://www.springframework.org/schema/aop https://www.springframework.org/schema/aop/spring-aop.xsd" ><import resource ="springDao.xml" /> <bean class ="com.liu10.mapper.UserMapperImpl" id ="userMapperImpl" > <property name ="sqlSession" ref ="sqlSession" /> </bean > <bean class ="com.liu10.mapper.UserMapperImpl2" id ="userMapperImpl2" > <property name ="sqlSessionFactory" ref ="sqlSessionFactory" /> </bean > </beans >