本文最后更新于:2024年5月10日 下午
AOP介绍
AOP(Aspect Oriented Programming)面向切面编程,是针对面向对象编程的一种补充,同时也是spring中第二个最核心的功能,例如可以进行权限认证,日志输出等,可以无侵入的对原来的功能进行切面加入自定义的非业务功能。
实现AOP的技术:
- 一是采用动态代理技术,利用截取消息的方式,对该消息进行装饰,以取代原有对象行为的执行;
- 二是采用静态织入的方式,引入特定的语法创建“方面”,从而使得编译器可以在编译期间织入有关“方面”的代码。
AOP用于SpringFramwork中:
- 提供声明式企业服务。 最重要的服务是声明式事务管理。
- 让用户实现自定义方面,以AOP补充其对OOP的使用。
AOP概念名词
以下名词概念都是来自官方文档,按个人理解进行翻译
concepts and terminology
- 【Aspect切面】:涉及多个类别的关注点的模块化。在Spring AOP中,方面是通过使用常规类(基于模式的方法)或使用包含@Aspect注解(@AspectJ样式)的常规类来实现的。
- 【Join point连接点】:程序执行过程中某一个特定的点。例如方法的执行或异常的处理。Spring AOP中连接点始终代表方法的执行
- 【Advice通知】:切面在特定连接点处采取的操作,即对原代码的增强功能,它分为前置、后置、异常、最终、环绕五类
- 【Pointcut切入点】:与连接点匹配的谓词,本质上是用于捕获连接点的结构。通知与切入点表达式关联,并在与该切入点匹配的任何连接点处运行
- 【Introduction引入】:在不修改类代码的前提下,为类添加新的属性和方法。例如可以试用Introduction使Bean实现IsModified接口,以简化缓存
- 【Target object目标对象】:被AOP框架代理增强的对象。
- 【AOP代理】:AOP框架创建的对象,用于对目标对象的增强。在Spring Framework中,AOP代理可以是JDK动态代理或CGLIB代理。
- 【Weaving织入】:将切面连接到其他应用程序类型或对象上,以创建一个被通知的对象。像其他纯Java AOP框架一样,Spring AOP在运行时执行编织。
Spring中通过Advice实现横切的逻辑插入,提供了五种Advice:
| 类型 |
连接点 |
实现接口 |
| 前置通知 |
方法前 |
org.springframework.aop.MethodBeforeAdvice |
| 后置通知 |
方法后 |
org.springframework.aop.AfterReturningAdvice |
| 环绕通知 |
方法前后 |
org.aopalliance.intercept.MethodInterceptor |
| 异常抛出通知 |
方法抛出异常 |
org.springframework.aop.ThrowsAdvice |
| 引介通知 |
类中新增方法属性 |
|
代码实现AOP
【注】使用AOP实现织入,要先导入aspectJ依赖包
1
2
3
4
5
6
|
<dependency>
<groupId>org.aspectj</groupId>
<artifactId>aspectjweaver</artifactId>
<version>1.9.5</version>
</dependency>
|
通过Spring API实现
1、编写业务类即接口和实现类
1
2
3
4
5
6
7
8
9
10
11
12
13
14
15
16
17
18
19
20
21
22
23
24
25
26
27
28
| public interface UserService {
void add();
void delete();
void update();
void select();
}
public class UserServiceImpl implements UserService{
@Override
public void add() {
System.out.println("增加用户");
}
@Override
public void delete() {
System.out.println("删除用户");
}
@Override
public void update() {
System.out.println("更新用户");
}
@Override
public void search() {
System.out.println("查询用户");
}
}
|
2、编写对应的增强类,在这儿我们写两个:一个前置一个后置
1
2
3
4
5
6
7
8
9
10
11
12
13
14
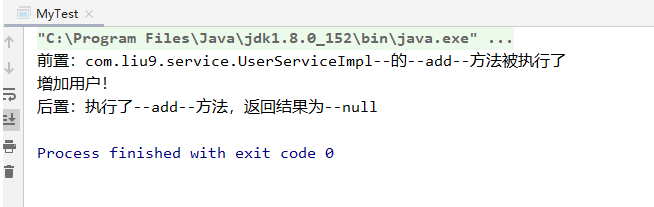
| public class Log implements MethodBeforeAdvice {
public void before(Method method, Object[] objects, Object o) throws Throwable {
System.out.println(o.getClass().getName()+"--的--"+method.getName()+"--方法被执行了");
}
}
public class AfterLog implements AfterReturningAdvice {
public void afterReturning(Object o, Method method, Object[] objects, Object o1) throws Throwable {
System.out.println("执行了--"+method.getName()+"--方法,返回结果为--"+o);
}
}
|
3、最后去Spring中注册,并实现AOP切入【要导入约束】
1
2
3
4
5
6
7
8
9
10
11
| <bean id="userService" class="com.liu9.service.UserServiceImpl"/>
<bean id="log" class="com.liu9.log.Log"/>
<bean id="afterLog" class="com.liu9.log.AfterLog"/>
<aop:config>
<aop:pointcut id="pointCut" expression="execution(* com.liu9.service.UserServiceImpl.*(..) )"/>
<aop:advisor advice-ref="log" pointcut-ref="pointCut"/>
<aop:advisor advice-ref="afterLog" pointcut-ref="pointCut"/>
</aop:config>
|
4、编写测试代码
1
2
3
4
5
6
7
8
9
10
11
12
13
14
15
16
17
| import com.liu9.service.UserService;
import com.liu9.service.UserServiceImpl;
import org.springframework.context.ApplicationContext;
import org.springframework.context.support.ClassPathXmlApplicationContext;
public class MyTest {
public static void main(String[] args) {
ApplicationContext context = new ClassPathXmlApplicationContext("ApplicationContext.xml");
UserService userService = (UserService)context.getBean("userService");
userService.add();
}
}
|
自定义类实现
1、在上述的service和serviceImpl不变的前提下,自定义一个切入类
1
2
3
4
5
6
7
8
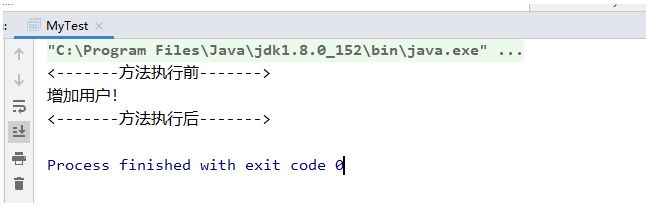
| public class diyPoint {
public void before(){
System.out.println("<-------方法执行前------->");
}
public void after(){
System.out.println("<-------方法执行后------->");
}
}
|
2、在Spring中配置
1
2
3
4
5
6
7
8
9
10
11
12
13
|
<bean id="diy" class="com.liu9.diy.diyPoint"/>
<aop:config>
<aop:aspect ref="diy">
<aop:pointcut id="point" expression="execution(* com.liu9.service.UserServiceImpl.*(..) )"/>
<aop:before method="before" pointcut-ref="point"/>
<aop:after method="after" pointcut-ref="point"/>
</aop:aspect>
</aop:config>
|
测试代码不变,测试执行:
注解实现
1、编写一个由注解是实现的增强类
1
2
3
4
5
6
7
8
9
10
11
12
13
14
15
16
17
18
19
20
21
22
23
24
25
26
27
28
29
30
31
32
33
34
| package com.liu9.diy;
import org.aspectj.lang.ProceedingJoinPoint;
import org.aspectj.lang.annotation.After;
import org.aspectj.lang.annotation.Around;
import org.aspectj.lang.annotation.Aspect;
import org.aspectj.lang.annotation.Before;
@Aspect
public class AnnotationPoint {
@Before("execution(* com.liu9.service.UserServiceImpl.*(..) )")
public void before(){
System.out.println("<-------3-方法执行前------->");
}
@After("execution(* com.liu9.service.UserServiceImpl.*(..) )")
public void after(){
System.out.println("<-------3-方法执行后------->");
}
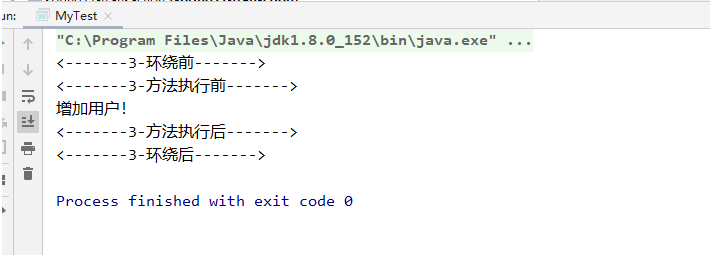
@Around("execution(* com.liu9.service.UserServiceImpl.*(..) )")
public void around(ProceedingJoinPoint pjp) throws Throwable {
System.out.println("<-------3-环绕前------->");
Object proceed = pjp.proceed();
System.out.println("<-------3-环绕后------->");
}
}
|
2、在配置文件中声明,并添加注解支持
1
2
3
4
|
<bean id="annotation" class="com.liu9.diy.AnnotationPoint"/>
<aop:aspectj-autoproxy/>
|
【说明】:通过aop命名空间的<aop:aspectj-autoproxy />声明自动为spring容器中那些配置@aspectJ切面的bean创建代理,织入切面。当然,spring 在内部依旧采用AnnotationAwareAspectJAutoProxyCreator进行自动代理的创建工作,但具体实现的细节已经被aop:aspectj-autoproxy />隐藏起来了
<aop:aspectj-autoproxy />有一个proxy-target-class属性,默认为false,表示使用jdk动态代理织入增强,当配为<aop:aspectj-autoproxy poxy-target-class="true"/>时,表示使用CGLib动态代理技术织入增强。不过即使proxy-target-class设置为false,如果目标类没有声明接口,则spring将自动使用CGLib动态代理。
3、测试