spring学习三-自动装配

本文最后更新于:2024年5月10日 下午

前言

在学习Spring自动装配和注解开发时,看狂神的视频,弹幕又刷刷刷的。。搞得人压根没看明白【看这种视频真就不能开弹幕……】只是知道了这几个标签,所以看一下《Spring实战 第四版》的装配bean章节学习一下。结合狂神的视频和书本知识,互相补充吧

Spring容器负责创建应用程序中的Bean并通过DI来协调这些对象之间的关系,在描述Bean装配操作时,Spring有很大的灵活性,它提供了三种主要的装配机制:

  • 在XML中显式装配
  • 在Java中显式装配
  • 隐式的bean发现机制和自动装配

作者推荐:尽可能使用自动装配机制,在必须要显式配置时,推荐使用类型安全且比XML更强大的JavaConfig。最后只有是想使用便利的XML命名空间并且在JavaConfig中没有同样的实现时才应用XML。推荐:自动装配>JavaConfig>XML

书上的顺序是自动装配->JavaConfig->XML,狂神视频是先讲XML再自动装配再JavaConfig,我以视频顺序为主,具体的知识点两者结合着做

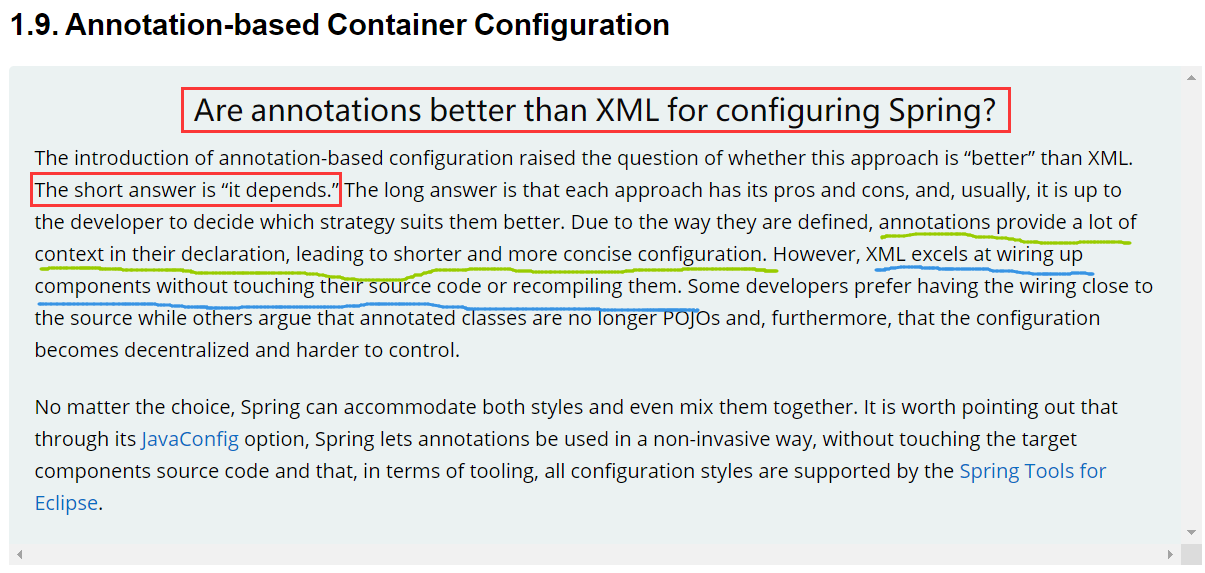
官方文档中给出的关于XML和configuration的问题看法:

image-20230420223247040

自动装配

书上关于自动装配的说法:

Spring的自动装配需要从两个角度来实现,或者说是两个操作:

  1. 组件扫描(component scanning):spring会自动发现应用上下文中所创建的bean;
  2. 自动装配(autowiring):spring自动满足bean之间的依赖,也就是我们说的IoC/DI;

组件扫描和自动装配组合就能发挥巨大威力,使得显示的配置降低到最少。

下面就用实例来说明一下。

准备环境

新建一个module叫做spring05-AutoWired,创建pojo实体类,Cat Dog 都有一个embark的方法

1
2
3
4
5
6
7
8
9
10
public class Dog {
public void embark(){
System.out.println("汪汪汪!!!");
}
}
public class Cat {
public void embark(){
System.out.println("喵~~");
}
}

创建用户类Man,包含属性Dog、cat、name,然后生成对应的toString、set和get方法

1
2
3
4
5
public class Man {
private Cat cat;
private Dog dog;
private String name;
}

编写配置文件beans.xml

1
2
3
4
5
6
7
8
9
10
11
12
13
14
15
<?xml version="1.0" encoding="UTF-8"?>
<beans xmlns="http://www.springframework.org/schema/beans"
xmlns:xsi="http://www.w3.org/2001/XMLSchema-instance"
xsi:schemaLocation="http://www.springframework.org/schema/beans
http://www.springframework.org/schema/beans/spring-beans.xsd">

<bean id="dog" class="com.liu.pojo.Dog"/>
<bean id="cat" class="com.liu.pojo.Cat"/>

<bean id="user" class="com.liu.pojo.Man">
<property name="cat" ref="cat"/>
<property name="dog" ref="dog"/>
<property name="name" value="刘义"/>
</bean>
</beans>

编写测试类MyTest,测试上面的代码,输出的正常,表示环境搭建无误

1
2
3
4
5
6
7
8
9
10
11
12
public class MyTest {
@Test
public void testMethodAutowire() {
ApplicationContext context = new ClassPathXmlApplicationContext("beans.xml");
User user = (User) context.getBean("user");
user.getCat().shout();
user.getDog().shout();
}
}
//输出:
//汪汪汪!!!
//喵~~

自动装配xml配置

byName标签

autowire byName (按名称自动装配)

由于在手动配置xml过程中,常常发生字母缺漏和大小写等错误,而无法对其进行检查,使得开发效率降低。

采用自动装配将避免这些错误,并且使配置简单化。

修改bean配置,增加一个属性autowire="byName"

1
2
3
4
<bean id="man" class="com.liu.pojo.Man" autowire="byName">
<property name="name" value="刘义"/>
</bean>
<!--再次在MyTest中测试,依旧可以成功-->

cat的bean id修改为cat123,再次测试,发现报空指针java.lang.NullPointerException错误,这是因为采用byName规则无法找到对应的set方法,真正的set方法没有执行,对象未初始化,所以会报空指针错误!

总结:

当一个bean节点带有 autowire byName的属性时。

  1. 将查找其类中所有的set方法名,例如setCat,获得将set去掉并且首字母小写的字符串,即cat。
  2. 去spring容器中寻找是否有此字符串名称id的对象。
  3. 如果有,就取出注入;如果没有,就报空指针异常。

byType标签

autowire byType (按类型自动装配)

使用byType就跟byName方式类似了,不过byType看名字就知道它是按照类型去装配。

照例修改属性autowire="byType",然后进行测试,测试依然成功

1
2
3
<bean id="man" class="com.liu.pojo.Man" autowire="byType">
<property name="name" value="刘义"/>
</bean>

这时,我们如果再注册一个cat的bean对象:

1
2
3
4
5
6
<bean id="cat" class="com.liu.pojo.Cat"/>
<bean id="cat2" class="com.liu.pojo.Cat"/>

<bean id="man" class="com.liu.pojo.Man" autowire="byType">
<property name="name" value="刘义"/>
</bean>

再次测试报错NoUniqueBeanDefinitionException,即bean对象不唯一,所以要注意同一类型的对象,在spring容器中必须唯一。如果不唯一,会报不唯一的异常。

再次修改,删除重复的cat2,再将cat的名字改掉,重新测试,依旧能允许,说明了按类型装配队id属性的值没有要求,即id属性不会影响结果

1
2
3
4
5
6
<bean id="catWrongId" class="com.liu.pojo.Cat"/>

<bean id="man" class="com.liu.pojo.Man" autowire="byType">
<property name="name" value="刘义"/>
</bean>
<!--依旧运行成功了-->

使用注解装配

书上关于自动装配主要是注解实现,视频也是推荐不去使用自动装配xml配置 , 而使用注解 .

这里参考书,讲狂神的spring03 自动装配spring04 注解开发整合在一起,便于直观理解

使用注解前要先引入context约束,官方文档描述:

1
2
3
4
5
6
7
8
9
10
11
12
13
14
<?xml version="1.0" encoding="UTF-8"?>
<beans xmlns="http://www.springframework.org/schema/beans"
xmlns:xsi="http://www.w3.org/2001/XMLSchema-instance"
//引入context文件头
xmlns:context="http://www.springframework.org/schema/context"
xsi:schemaLocation="http://www.springframework.org/schema/beans
https://www.springframework.org/schema/beans/spring-beans.xsd
http://www.springframework.org/schema/context
https://www.springframework.org/schema/context/spring-context.xsd">

<!--开启属性注解支持-->
<context:annotation-config/>

</beans>

@Component

1
2
3
4
5
6
7
//@Component 等价于 <bean id="name" class="com.liu.pojo.User"/>
@Component
public class User {
@Value("刘义")
// 相当于配置文件中 <property name="name" value="刘义"/>
public String name;
}

书中出现的第一个注解标签,使用@Component注解表明该类会作为组件类,并告知Spring为该类创建bean。

不过组件扫描默认是不启用的,所以还要显示配置一下Spring,从而命令它去寻找带有@Component注解的类并创建bean:

  • 书上采用的是创建一个对应的UserConfig类,打上@Configuration和@ComponentScan注解:
1
2
3
4
5
6
package com.liu.pojo;
@Configuration
@ComponentScan
public class UserConfig{

}

@ComponentScan默认扫描与配置类相同的包,即com.liu.pojo包下的所有子包,并查找带有@Component注解的类

  • 如果更倾向于使用XML启动组件扫描,也可以在xml文件中添加以下代码:
1
2
<!--指定要扫描的包,这个包下的注解就会生效-->
<context:component-scan base-package="com.liu.pojo"/>

IDEA左侧出现一个绿色小叶子,点击就会跳转到对应的ApplicationContext.xml上:

image-20230420223310765

在MyTest中测试上述代码是否正确:

1
2
3
4
5
6
7
8
9
public class MyTest {
public static void main(String[] args) {
ApplicationContext context = new ClassPathXmlApplicationContext("ApplicationContext.xml");

User user = context.getBean("user", User.class);
System.out.println(user.name);
}
}
//输出:刘义

验证OK,即@Component注解确实创建了bean!

为组件扫描的bean命名

可以看到上述代码中其实没有显式创建bean,对应的bean id也是没显式声明的,而我在测试代码中getBean("user")拿到了对应的bean。书上有解释:因为Spring会根据类名指定一个ID,具体来讲就是类名的第一个字母小写。

那么怎样设置自己想要的id呢?查看@Component注解的源码,发现它有个value的属性,所以我们可以设置对应value,即为显式的id

1
2
3
4
5
public @interface Component {
String value() default "";
}
//设置为 @Component("MyUser")
//对应测试的getBean中 id就为MyUser

书上还介绍了另一种规范:@Named("MyUser")……推荐还是上一个

设置扫描的包

默认情况下,使用@ComponentScan会以当前类所在的包为基础包,如果想扫描不同的包,或者多个基础包,又该怎样操作呢?书上给出了解决方法:

1
2
3
4
5
6
7
8
9
package com.liu.pojo;
@Configuration
//可以设置@ComponentScan的value:
@ComponentScan("com.liu.pojo")
public class UserConfig{}
//@ComponentScan(basePackages={"com.liu.pojo","com.liu.dao"......})

//还可以指定接口
//@ComponentScan(basePackageClasses={User.Class,UserDao.Class......})

至于之前的另一个方式xml,基本上不用改啥,它的属性<context:component-scan base-package="com.liu" />就有设置扫描包位置。

@Autowired

上面的是自动扫描的操作,另一个就是进行自动装配,可以用@Autowired注解实现!

  • @Autowired是按类型自动转配的,不支持id匹配。
  • 需要导入 spring-aop的包!

将一开始的User类中的setter方法去掉,在属性上添加@Autowired注解:

1
2
3
4
5
6
7
8
9
public class Man {
@Autowired
private Cat cat;
@Autowired
private Dog dog;
private String name;

//get方法、toSting方法......
}

对应的配置文件也可以简化:

1
2
3
4
5
<context:annotation-config/>

<bean id="dog" class="com.liu.pojo.Dog"/>
<bean id="cat" class="com.liu.pojo.Cat"/>
<bean id="Man" class="com.liu.pojo.Man"/>

测试,输出成功!

  • @Autowired不仅能用在setter方法上,也可以用在构造器上,加在构造器上时,表示会通过该构造器来进行实例化并传入一个可以设置给对应参数类型的bean
  • @Autowired还可以用在其他方法上,本质上都是Spring尝试去满足方法参数上所声明的依赖

如果没有匹配的bean时,会抛出异常!

解决方法:@Autowired(required=false) ——表示注入时容器对象bean可以为null,默认值是true。

【注】在容器的启动过程中,会初始化很多bean,这也是spring的核心之一(IOC)。但是在注入的过程中,扫描到公共方法中要注入的bean,并未找到,强行注入就会注入失败。我们又不能单独的去除改方法,所以我们采取的思想就是有bean就注入,没有就不注入。解决办法就是@Autowired(required=false)。

使用required属性,需要谨慎对待,如果代码中没有null检查的话,可能会报空指针异常;如果多个bean都满足依赖,Spring会报异常NoUniqueBeanDefinitionException,出现书后面章节所说的歧义性

@Qualifier
  • @Autowired是根据类型自动装配(byType)的,加上@Qualifier则可以根据byName的方式自动装配
  • @Qualifier不能单独使用。

修改配置文件内容:

1
2
3
4
<bean id="dog1" class="com.kuang.pojo.Dog"/>
<bean id="dog2" class="com.kuang.pojo.Dog"/>
<bean id="cat1" class="com.kuang.pojo.Cat"/>
<bean id="cat2" class="com.kuang.pojo.Cat"/>

如果没加@Qualifier代码就会直接报红,因为@Autowired按类型装配,此时同一类型对象不唯一,无法装配;加上@Qualifier后,类型装配不行的话就会再查找name,就能通过了~

@Resource

  • @Resource如有指定的name属性,先按该属性进行byName方式查找装配;
  • 其次再进行默认的byName方式进行装配;
  • 如果以上都不成功,则按byType的方式自动装配。
  • 都不成功,则报异常。

1 测试一下:

1
2
3
4
5
6
7
8
public class User {
//如果允许对象为null,设置required = false,默认为true
@Resource(name = "cat2")
private Cat cat;
@Resource
private Dog dog;
private String str;
}

对应配置文件

1
2
3
4
5
<bean id="dog" class="com.kuang.pojo.Dog"/>
<bean id="cat1" class="com.kuang.pojo.Cat"/>
<bean id="cat2" class="com.kuang.pojo.Cat"/>

<bean id="user" class="com.kuang.pojo.User"/>

测试结果正常!

将@Resource的name属性去掉,cat2去掉,再次测试,依然正常,说明上述的方法正确

JavaConifg装配bean

有时我们不得不使用显式装配,比如想将第三方类库装配到自己的应用中时,肯定不能在它的类上添加注解,所以就只能显式装配了。

JavaConfig的实现是通过注解完成的,因此先介绍一下注解开发

注解开发

Spring4之后使用spring注解要引入aop包,在配置文件当中,还得要引入一个context约束

1
2
3
4
<xmlns:aop="http://www.springframework.org/schema/aop"
xsi:schemaLocation="
https://www.springframework.org/schema/aop/spring-aop.xsd">
<context:annotation-config/>

Bean的实现

之前都是在xml中使用 bean 的标签进行bean注入,但是实际开发中完全可以使用注解

1、配置要扫描的包(会包含bean对象的)

1
2
<!--指定要扫描的包,这个包下的注解就会生效-->
<context:component-scan base-package="com.liu" />

2、在指定包下编写类,添加注解

1
2
3
4
5
6
7
//@Component 等价于 <bean id="name" class="com.liu.pojo.User"/>
@Component
public class User {
//等价于<property name="name" value="刘义"/>
@Value("刘义")
public String name;
}

【注】:这里在String name上添加了注解@Value相当于通过注解注入了属性值,如果有提供set方法,可以在set方法生添加@Value("值")

3、编写测试类测试代码

1
2
3
4
5
6
7
public static void main(String[] args) {
ApplicationContext context = new ClassPathXmlApplicationContext("ApplicationContext.xml");

User user = context.getBean("user", User.class);
System.out.println(user.name);
}
//输出:刘义

衍生注解

使用注解的目的就是为了简化配置文件,进一步简化开发、提高效率

@Component的三个衍生注解

为了更好的分层,Spring可以使用其他的三个注解

  • @Controller:web层
  • @Service:service层
  • @Repository:dao层

Spring会扫描这些注释,自动识别为对应的层去管理

作用域@Scope

  • singleton:默认的,表示Spring会采用单例模式创建对象。关闭工厂后所有对象也随之销毁
  • prototype:多例模式。关闭工厂后所有对象不会全销毁,内部垃圾回收机制会回收

JavaConfig装配

JavaConfig 原来是 Spring 的一个子项目,它通过 Java 类的方式提供 Bean 的定义信息,在 Spring4 的版本, JavaConfig 已正式成为 Spring4 的核心功能 。

1、首先还是定义一个pojo实体类User

1
2
3
4
5
6
7
8
9
10
11
12
13
14
15
16
17
18
19
20
21
22
23
24
/**
* @Author: Salute61
* @Date: 2020/10/2 16:10
* @Description: some description
*/
public class User {
private String name;

public String getName() {
return name;
}

@Value("刘义616161")
public void setName(String name) {
this.name = name;
}

@Override
public String toString() {
return "User{" +
"name='" + name + '\'' +
'}';
}
}

2、新建一个Config包,创建一个liuConfig文件

1
2
3
4
5
6
7
8
@Configuration
public class liuConfig {

@Bean
public User getUser(){
return new User();
}
}

【注】@Configuration标签表示这是一个配置类,在类中添加@Bean标签,通过方法去注册一个bean,返回值就是bean的类型,方法名就是bean的id

3、编写测试代码

1
2
3
4
5
6
7
8
9
public class MyTest {
public static void main(String[] args) {
ApplicationContext context = new AnnotationConfigApplicationContext(liuConfig.class);

User user = (User) context.getBean("getUser");
System.out.println(user.getName());
}
}
//输出:刘义616161

也可以继续再编写另外的Config代码,通过@Import(xxx.class)方式导入合并其他的配置类


spring学习三-自动装配
https://61hhh-github-io.vercel.app/20201014/1fc32a2/
作者
LY
发布于
2020年10月14日
许可协议