本文最后更新于:2024年5月10日 下午
Spring应用 IoC的基本思想了解了,就可以尝试应用Spring了。以项目hello为例,学习一下使用Spring的基本流程。
这是第一部分:演示一遍Spring;后面还有Spring依赖注入方式说明;bean作用域说明。
导入jar包 在maven仓库中搜Spring,可以看到很多依赖,我们选择spring-webmvc来导入,它能导入其他需要的文件
1 2 3 4 5 <dependency > <groupId > org.springframework</groupId > <artifactId > spring-webmvc</artifactId > <version > 5.1.10.RELEASE</version > </dependency >
编写代码 1、编写一个Hello实体类,并编写对应的setget方法和toString方法
1
2
3
4
5
6
7
8
9
10
11
12
13
14
15
16
17
18
19
20
21
22
23
24
25
package com.liu.pojo;public class Hello {private String str;public String getStr () {return str;public void setStr (String str) {this .str = str;@Override public String toString () {return "Hello{" +"str='" + str + '\'' +'}' ;
2、编写我们的spring文件 , 这里我们命名为beans.xml
1
2
3
4
5
6
7
8
9
10
11
12
13
14
15
16
<?xml version="1.0" encoding="UTF-8" ?> <beans xmlns ="http://www.springframework.org/schema/beans" xmlns:xsi ="http://www.w3.org/2001/XMLSchema-instance" xsi:schemaLocation ="http://www.springframework.org/schema/beans https://www.springframework.org/schema/beans/spring-beans.xsd" ><bean id ="hello" class ="com.liu.pojo.Hello" > <property name ="str" value ="Spring" /> </bean > </beans >
3、我们可以去进行测试了 .
1
2
3
4
5
6
7
8
9
10
11
12
13
14
15
16
17
18
19
import com.liu.pojo.Hello;import org.springframework.context.ApplicationContext;import org.springframework.context.support.ClassPathXmlApplicationContext;public class MyTest {public static void main (String[] args) {ApplicationContext context = new ClassPathXmlApplicationContext ("beans.xml" );Hello hello = (Hello) context.getBean("hello" );
回顾控制反转
修改Spring学习一 既然Spring提供了这么便捷的方法,我们完全可以将之前的代码重构,之前由构造函数到setter方法,现在再体验一下使用Spring方式简化操作!
在项目一中增加beans.xml文件:
1
2
3
4
5
6
7
8
9
10
11
12
13
14
15
<?xml version="1.0" encoding="UTF-8" ?> <beans xmlns ="http://www.springframework.org/schema/beans" xmlns:xsi ="http://www.w3.org/2001/XMLSchema-instance" xsi:schemaLocation ="http://www.springframework.org/schema/beans https://www.springframework.org/schema/beans/spring-beans.xsd" ><bean id ="mysql" class ="com.liu.dao.UserDaoMysqlImpl" /> <bean id ="oracle" class ="com.liu.dao.UserDaoOracleImpl" /> <bean id ="service" class ="com.liu.service.UserServiceImpl" > <property name ="userDao" ref ="mysql" /> </bean > </beans >
对应的测试代码也要修改为:
1 2 3 4 5 6 7 8 9 public static void main (String[] args) {ApplicationContext context = new ClassPathXmlApplicationContext ("beans.xml" );UserServiceImpl service = (UserServiceImpl)context.getBean("service" );
测试通过!如果要修改调用,不用再那么麻烦了,可以直接在xml文件中修改配置即可,例如改为UserDaoCustomImpl,只需要:
1 2 3 4 5 <bean id ="Custom" class ="com.liu.dao.UserDaoCustomImpl" /> <bean id ="service" class ="com.liu.service.UserServiceImpl" > <property name ="userDao" ref ="Custom" /> </bean >
IOC创建对象方式 介绍一下常见的创建对象方式
新建项目ioc2,编写User类,及其对应的方法
1
2
3
4
5
6
7
8
9
10
11
12
13
14
15
16
17
18
19
20
21
22
23
24
25
26
27
28
29
30
31
32
package com.liu.pojo;public class User {private String name;public User () {"User的无参构造!" );public User (String name) {this .name = name;"User的带参构造!" );public String getName () {return name;public void setName (String name) {this .name = name;public void show () {"name= " +name);
编写beans.xml
1
2
3
4
5
6
7
8
9
10
11
12
13
14
15
16
17
18
19
20
21
22
23
24
25
26
27
28
29
30
31
32
<?xml version="1.0" encoding="UTF-8" ?> <beans xmlns ="http://www.springframework.org/schema/beans" xmlns:xsi ="http://www.w3.org/2001/XMLSchema-instance" xsi:schemaLocation ="http://www.springframework.org/schema/beans https://www.springframework.org/schema/beans/spring-beans.xsd" ><bean id ="user" class ="com.liu.pojo.User" name ="u1,u2,u3" > <property name ="name" value ="刘义" /> </bean > <bean id ="arg1" class ="com.liu.pojo.User" > <constructor-arg index ="0" value ="带参刘义" /> </bean > <bean id ="arg2" class ="com.liu.pojo.User" > <constructor-arg type ="java.lang.String" value ="带参刘义2" /> </bean > <bean id ="arg3" class ="com.liu.pojo.User" > <constructor-arg name ="name" value ="带参刘义3" /> </bean > </beans >
测试代码:
1
2
3
4
5
6
7
8
9
10
11
12
13
14
15
16
17
18
19
20
21
import com.liu.pojo.User;import org.springframework.context.ApplicationContext;import org.springframework.context.support.ClassPathXmlApplicationContext;public class MyTest {public static void main (String[] args) {ApplicationContext context = new ClassPathXmlApplicationContext ("beans.xml" );User u1 = (User) context.getBean("u1" );User user = (User) context.getBean("arg1" );User user2 = (User) context.getBean("arg2" );
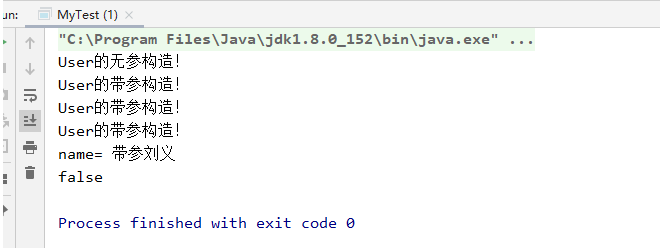
查看结果:
可以看到结果中:一个无参三个带参的构造函数都显示了,跟xml文件中的一致,并且是在show方法之前就显示了,**说明spring中的bean在注册context容器时就将其实例化了,因为spring默认单例模式实现! **
总结 Spring的学习其实和Mybatis类似,感觉通过配置文件来简化操作。最重要的是理解Spring的核心思想——IoC控制反转!
基本步骤:创建pojo–>编写配置文件–>测试
Spring依赖注入DI 依赖注入DI(Dependency Injection)这个概念很重要,就是指应用程序本身不再负责对象的创建和维护,应用程序所需要的类在应用加载启动的时候创建完成,并通过set方法将类直接加载到应用程序中(DI)。
SPring中依赖注入的方式也很多,可以参考文档 1.4 Dependencies 了解详细信息
1、构造器注入 在之前的代码中已经说过,它只能叫注入,不属于Spring的注入,这个其实也不推荐
2、Set注入 要求被注入的属性 , 必须有set方法 , set方法的方法名由set + 属性首字母大写 , 如果属性是boolean类型 , 没有set方法 , 是 is 。
编写pojo实体类Address
1
2
3
4
5
6
7
8
9
10
11
12
13
14
15
16
17
18
public class Address {private String address;public String getAddress () {return address;public void setAddress (String address) {this .address = address;@Override public String toString () {return "Address{" +"address='" + address + '\'' +'}' ;
student类:
1
2
3
4
5
6
7
8
9
10
11
12
13
public class Student {private String name;private Address address;private String[] books;private List<String> hobbies;private Map<String,String> card;private Set<String> games;private String girlFriends;private Properties info;
准备对应的xml文件:
1
2
3
4
5
6
7
8
9
10
11
12
13
14
15
<?xml version="1.0" encoding="UTF-8" ?> <beans xmlns ="http://www.springframework.org/schema/beans" xmlns:xsi ="http://www.w3.org/2001/XMLSchema-instance" xsi:schemaLocation ="http://www.springframework.org/schema/beans https://www.springframework.org/schema/beans/spring-beans.xsd" ><bean id ="address" class ="com.liu.pojo.Address" > <property name ="address" value ="徐州" /> </bean > <bean id ="student" class ="com.liu.pojo.Student" > </bean > </beans >
以下是几种常见类型数据的注入方式:
1 2 <property name ="name" value ="刘义" />
1 2 <property name ="address" ref ="address" />
1 2 3 4 5 6 7 8 9 <property name ="books" > <array > <value > 《西游记》</value > <value > 《水浒传》</value > <value > 《三国演义》</value > <value > 《红楼梦》</value > </array > </property >
1 2 3 4 5 6 7 8 9 <property name ="hobbies" > <list > <value > 踢足球</value > <value > 看小说</value > <value > 写代码</value > <value > 打游戏</value > </list > </property >
1 2 3 4 5 6 7 8 <property name ="card" > <map > <entry key ="身份证" value ="xxxyyy199908042417" /> <entry key ="校园卡" value ="CUMT08173000" /> <entry key ="银行卡" value ="RichMan99999999" /> </map > </property >
1 2 3 4 5 6 7 8 <property name ="games" > <set > <value > Counter-Striker: GO</value > <value > The-Witcher3: Wild Hunt</value > <value > FIFA 20</value > </set > </property >
1 2 3 4 <property name ="girlFriends" > <null /> </property >
1 2 3 4 5 6 7 8 <property name ="info" > <props > <prop key ="学号" > 08173000</prop > <prop key ="性别" > 男</prop > <prop key ="邮箱" > salute61@163.com</prop > </props > </property >
编写测试代码:
1
2
3
4
5
6
7
8
9
10
11
12
13
14
15
16
public static void main (String[] args) {ApplicationContext context = new ClassPathXmlApplicationContext ("beans.xml" );Student student = (Student) context.getBean("student" );
官方文档在介绍完这两种注入方式后,有以下的内容:翻译一下:
基于构造函数的注入还是基于Setter方法的注入?
由于可以混合使用基于构造函数的DI和基于setter的DI,因此将构造函数用于强制性依赖项并将setter方法或配置方法用于可选依赖性是一个很好的经验法则【注意,可以在setter方法上使用@Required批注,以使该属性成为必需的依赖项。但是,最好使用带有参数的程序验证的构造函数注入】
Spring团队通常提倡构造函数注入,因为它可以让您将应用程序组件实现为不可变对象,并确保不存在必需的依赖项。此外,注入构造函数的组件始终以完全初始化的状态返回到客户端(调用)代码。【附带说明一下,大量的构造函数参数会产生坏味代码,这意味着该类可能承担了太多的职责,应该对其进行重构以更好地解决关注点之间的分离】
Setter注入主要应仅用于可以在类中分配合理的默认值的可选依赖项。否则,必须在代码使用依赖项的任何地方执行非空检查。 setter注入的一个好处是,setter方法使该类的对象在以后可以重新配置或重新注入。因此,通过JMX MBean进行管理是用于setter注入的引人注目的用例。
使用最适合特定类的DI风格。有时,在处理您没有源代码的第三方类时,如果第三方类未公开任何setter方法,则构造函数注入可能是DI的唯一可用形式。
3、其他注入方式 Spring支持的注入方式很多,文档中还介绍了p命名空间和c命名空间,对于这两种方式,使用前要先导入约束
1
2
3
4
5
6
7
8
<?xml version="1.0" encoding="UTF-8" ?> <beans xmlns ="http://www.springframework.org/schema/beans" xmlns:xsi ="http://www.w3.org/2001/XMLSchema-instance" xmlns:p ="http://www.springframework.org/schema/p" xmlns:c ="http://www.springframework.org/schema/c" xsi:schemaLocation ="http://www.springframework.org/schema/beans https://www.springframework.org/schema/beans/spring-beans.xsd" >
P命名空间注入 : 相当于properties简写模式,
1 2 <bean id ="user" class ="com.liu.pojo.User" p:name ="p-刘义" p:age ="18" > </bean >
c 命名空间注入 : c即constructor实现,因此要加上对应的构造器,不然就会报错
1 2 <bean id ="user2" class ="com.liu.pojo.User" c:name ="c-刘义" c:age ="18" > </bean >
再编写相关的测试代码验证即可。
bean的作用域 这是官方文档1.5Bean Scopes 中对bean定义的描述
创建一个bean定义,其实质是用该bean定义对应的类来创建真正实例的“配方(recipe)”。把bean定义看成一个配方很重要,它与class很类似,只根据一张“配方”就可以创建多个实例。不仅可以控制注入到对象中的各种依赖和配置值,还可以控制该对象的作用域。这样可以灵活选择所建对象的作用域,而不必在Java Class级定义作用域。Spring Framework支持五种作用域
以下是常见的四种作用域的定义内容:
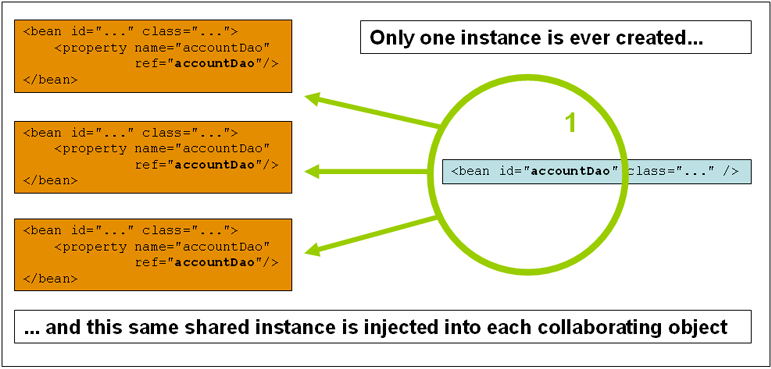
1、SingleTon 当一个bean的作用域为Singleton,那么Spring IoC容器中只会存在一个共享的bean实例,并且所有对bean的请求,只要id与该bean定义相匹配,则只会返回bean的同一实例。
Singleton是单例类型,就是在创建容器时就同时自动创建了一个bean的对象,不管你是否使用,他都存在了,每次获取到的对象都是同一个对象(上面演示代码中就有出现)。注意,Singleton作用域是Spring中的缺省作用域。
文档中提到:Spring的单例模式和四人帮(GoF)的单例模式不同。GoF单例对对象的范围进行硬编码,以使每个ClassLoader只能创建一个特定类的一个实例。 而Spring单例的作用域最好描述为每个容器和每个bean。 这意味着:如果在单个Spring容器中为一个特定类定义一个bean,则Spring容器将创建由该bean定义所定义的类的一个且只有一个实例。 Singleton范围是Spring中的默认范围。 要将bean定义为XML中的单例,可以定义bean,如以下示例所示:
1 2 3 4 <bean id ="accountService" class ="com.something.DefaultAccountService" /> <bean id ="accountService" class ="com.something.DefaultAccountService" scope ="singleton" />
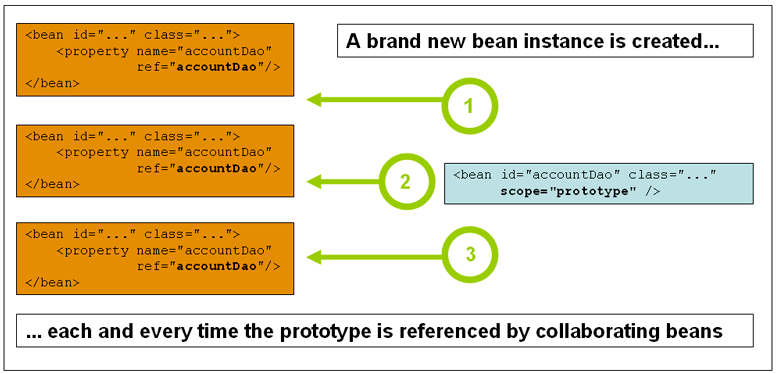
2、Prototype 当一个bean的作用域为Prototype,表示一个bean定义对应多个对象实例。Prototype作用域的bean会导致在每次对该bean请求(将其注入到另一个bean中,或者以程序的方式调用容器的getBean()方法)时都会创建一个新的bean实例。Prototype是原型类型,它在我们创建容器的时候并没有实例化,而是当我们获取bean的时候才会去创建一个对象,而且我们每次获取到的对象都不是同一个对象。根据经验,对有状态的bean应该使用prototype作用域,而对无状态的bean则应该使用singleton作用域。在XML中将bean定义成prototype,可以这样配置:
1 2 3 4 <bean id ="account" class ="com.foo.DefaultAccount" scope ="prototype" /> <bean id ="account" class ="com.foo.DefaultAccount" singleton ="false" />
3、Request 当一个bean的作用域为Request,表示在一次HTTP请求中,一个bean定义对应一个实例;即每个HTTP请求都会有各自的bean实例,它们依据某个bean定义创建而成。该作用域仅在基于web的Spring ApplicationContext情形下有效。考虑下面bean定义:
1 <bean id ="loginAction" class =cn.csdn.LoginAction " scope ="request" />
针对每次HTTP请求,Spring容器会根据loginAction bean的定义创建一个全新的LoginAction bean实例,且该loginAction bean实例仅在当前HTTP request内有效,因此可以根据需要放心的更改所建实例的内部状态,而其他请求中根据loginAction bean定义创建的实例,将不会看到这些特定于某个请求的状态变化。当处理请求结束,request作用域的bean实例将被销毁。
4、Session 当一个bean的作用域为Session,表示在一个HTTP Session中,一个bean定义对应一个实例。该作用域仅在基于web的Spring ApplicationContext情形下有效。考虑下面bean定义:
1 <bean id ="userPreferences" class ="com.foo.UserPreferences" scope ="session" />
针对某个HTTP Session,Spring容器会根据userPreferences bean定义创建一个全新的userPreferences bean实例,且该userPreferences bean仅在当前HTTP Session内有效。与request作用域一样,可以根据需要放心的更改所创建实例的内部状态,而别的HTTP Session中根据userPreferences创建的实例,将不会看到这些特定于某个HTTP Session的状态变化。当HTTP Session最终被废弃的时候,在该HTTP Session作用域内的bean也会被废弃掉。